Lesson 1 – Setting up a MainWP Development Environment
Setting up a development environment to work with MainWP is pretty straight forward. We personally like Laragon for its ease of use and fast WordPress Installations without the need to download anything extra to get started.
With Laragon, setting up a local development environment for PHP-based projects is quick and hassle-free, allowing you to focus more on coding and less on server configuration.
Installing Laragon & WordPress
Here’s a step-by-step guide to get you started:
- Download Laragon: Visit the Laragon website and download the version compatible with your operating system.
- Install Laragon: Once the download is complete, run the installer and follow the on-screen instructions to install Laragon on your system. Laragon typically installs quickly and doesn’t require much configuration.
- Launch Laragon: After installation, launch Laragon from the Start menu or desktop shortcut.
- Start Laragon and Servers: When Laragon starts, it will automatically launch its services such as Apache, MySQL, PHP, and other tools necessary for development. You’ll see green indicators next to each service once they are up and running.
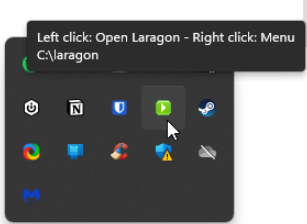
- Access Laragon Dashboard: Laragon provides a dashboard accessible through the Laragon icon in the system tray (Windows) or menu bar (macOS). You can use this dashboard to manage your projects, databases, services, and settings.
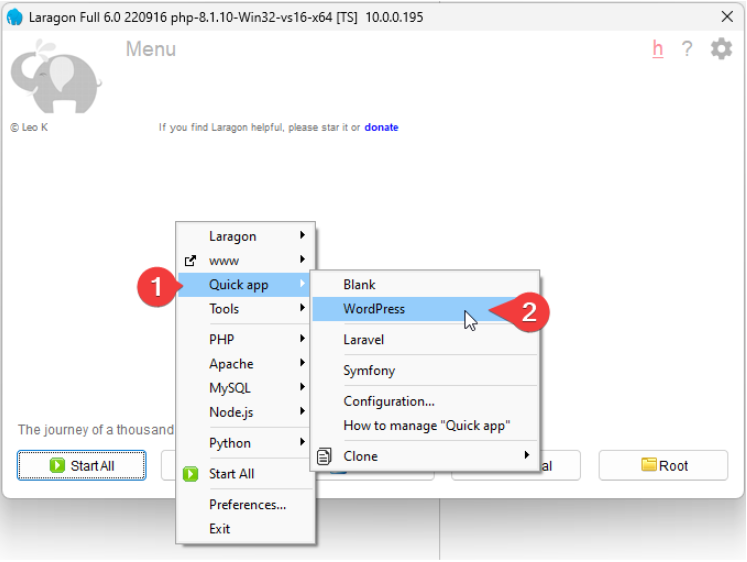
- Create a Project: Laragon makes it easy to create new projects. Click on the “www” menu in the Laragon dashboard, then select “Quick app” to create a new project. You can choose from various pre-configured applications like WordPress, Laravel, Symfony, etc., or create a custom project. In this example we are going to choose to install a WordPress Site.
- Accessing Your Project: Once your project is created, you can access it by typing its URL (usually http://project-name.test/) into your web browser. Laragon automatically sets up virtual hosts for your projects, making them accessible through user-friendly URLs.
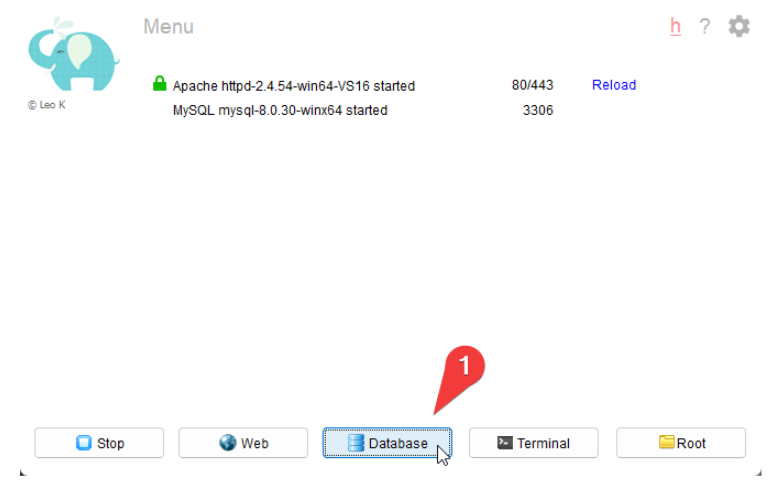
- Database Management: Laragon includes phpMyAdmin for managing MySQL databases. You can access phpMyAdmin by clicking on the database menu button in the Laragon dashboard and then click open. From there, you can then select the projects database that you created during installation. From here you can create, import, export, and manage databases as needed.
- Customization and Advanced Configuration: Laragon offers numerous customization options and advanced features such as SSL support, environment variables, Git integration, Composer support, etc. Explore the Laragon documentation and settings to tailor your development environment to your needs.
Installing MainWP Dashboard & Child Plugin
Now that Laragon & WordPress are installed we can go ahead and install a local copy of MainWP Dashboard & any add-ons you may want installed in your environment.
- Download MainWP Dashboard Plugin: Visit the MainWP website and download the MainWP Dashboard plugin. You can download it from the “Downloads” section after creating an account.
- Install MainWP Dashboard Plugin: Log in to your WordPress dashboard for your Laragon project. Go to Plugins > Add New and upload the MainWP Dashboard plugin that you downloaded in the previous step. Activate the plugin once it’s uploaded & follow the on screen prompts to finish installing the MainWP Dashboard onto the WordPress Installation we created above.
- Install MainWP Child Plugin: Now, you need to install the MainWP Child plugin on each of the WordPress sites you want to manage using MainWP. You can download the MainWP Child plugin from the WordPress plugin repository. Install and activate the MainWP Child plugin on each site.
- Connect Child Sites to MainWP Dashboard: Once the MainWP Child plugin is activated on each site, go to the MainWP Dashboard (accessible via the WordPress admin menu) and navigate to Sites > Add New. Enter the URL and login credentials for each child site you want to connect to the MainWP Dashboard.
With MainWP successfully installed, our basic local development environment setup is complete, and we’re ready to dive into creating new features! Of course, you don’t have to stop here. As mentioned Laragon supports a lot of the developer tools that you may already be familiar with on the market including but not limited to Git, Composer, SSL Support, Environment Variable, etc.
In the upcoming lesson, we’ll cover essential guidelines for developing a new MainWP Add-on. Additionally, we’ll explore the MainWP Development Add-on structure & what needs to be renamed so you may kickstart your development journey & start developing with ease.